
Hello there lovelies! The New Year has arrived (although I am a little late for that now!) , and for me that brings forward a refreshed desire to organize! I took part of my winter holiday break to reorganize my bedroom so I could start the year fresh. I mainly wanted to clear out my closet so that my room would stop looking like a huge mess with clothes strewn everywhere. In my purge and reorganization I came across an old sweater of mine that now unfortunately looks a bit worse for wear. There are some clear set in stains, that no manner of laundry magic can remove. In that sweater a perfect opportunity was presented, I could up-cycle the clean parts of this beloved s
sweater into something great.

I do have to admit that I don't love working with knit fabrics, and I've certainly never worked with anything like a cable knit. But, ever-so determined, I needed to find a small and feasible project for this sweater. I was listening to the Love to Sew podcast, and the episode on accessories. They talked about a whole slew of small projects but the one that caught my attention was, the Atlas mittens by Victory Patterns. What a perfect match this was, because as I was reading through the pattern, the designers intended you to up-cycle sweaters to make these! The mittens I ultimately choose to make have a knit top, and a leather palm. Another great use for all my leather swatches and scraps that I have lying around the studio! So follow me on my little adventure of making my first pair of mittens!
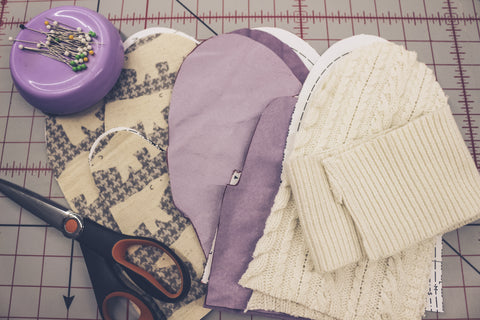
What you will need to make your own pair of adorable mittens:
- old sweater you want to up-cycle
- Lining fabric, I recommend something cozy like flannel or fleece
- Optional: Leather or vegan leather , faux fur (for a fancy cuff) , or ribbing for cuff
- Pattern - I used the Atlas Mittens by Victory Patterns
I was so surprised how easy and quick these were to make!
First things first - Pick your sweater! Like I mentioned earlier, this sweater had some stains, and had been well worn. You will need to deconstruct your sweater, so do not be afraid! I myself have spent a lot of time psyching myself up to cut into some of my beloved fabrics, but just think of the brilliant mittens you will have at the end!
Cut your sweater at the seams - side seams, armhole seams, and should seams.

Having your sweater in separate panels will help you cut your pieces out more easily. Especially if you have to fussy cut any pieces, like I did, around some holes and stains, whoops.
Once your sweater is all prepped, gather your pattern, and your other fabrics for your lining, and palm (if you are doing a contrast fabric).
I cut out all my pieces according to the instructions. I also used the ribbing from my sweater to use as my cuffs, and now I am ready to sew! These mittens are so easy that there are only about 4 seams per mitten!
I sewed my palm pieces first, and since I am sewing leather I used a teflon foot to prevent the "suede" side of the hide to stick to my presser foot. If you don't have a teflon foot, use some scotch tape, and stick it to the underside of your presser foot.

With my palms sewn, I sewed them to my outer mitt piece, which is my sweater. Although it doesn't say in the pattern, I wished I would have used some fusible stabilizer on the sweater. Because the sweater has such an open knit, it feels a bit loose for my liking. Another thing I did to help me in this step is wonder clips. Because you can't use pins with leather, since the holes would perforate the leather and never close up, deteriorating the strength.

With some wonder clips, everything stayed together in place. I did the same steps for the lining of the mittens and then I joined them wrong sides together to apply the cuff.

In the instructions it has you hand sew the second layer of the cuff to hide the raw edges of the mitten, but because I cannot be bothered to hand sew anything, I decided to go in a different direction. I had lots of binding lying around so I decided to bind that raw edge. It was kind of difficult going through all those layers, so make sure your needle is able to handle it. A 90 leather needle would work well. Or you could always use some ribbon to hide the seam, or some fusible tape? If you guys come up with different ideas let me know in the comments!
In a matter of an hour I managed to finish these great mittens, perfect timing for all the snow that we started getting in the northeast!

If you guys make these mittens please send pictures! I can't wait to see what you make! Tag me on instagram @thefabricunicorn


